GUILT - Kyriaki [Concealed Blades]
This advice applies to all Operations that involve Kyriaki.
Kyriaki is the most common GUILT Type, occuring in ten patients across the entire game, so being proficient at tackling it will show huge benefits to your time.
Improving your Kyriaki will also greatly help with your tool switching across the entire game, given how skill based it is.
If you’d like a visual breakdown with commentary and annotations, please find my breakdown here.
Vitals
Any time you expose Kyriaki, it will deal 6 damage. However, the cuts also do damage over time and so if they are left alone they can tick the vital lower than this minimum threshold.
When a wave starts, and the number of initial cuts are created determine how many immatures are in a wave, vitals are dropped for each immature that is spawned (and their subsequent cuts).
On the final wave, when the mature Kyriaki spawns, it deals 18 damage when creating the asterisk cut. The two critical values to remember are 40 vitals for when there is no immature, and 50 vitals when there is an accompanying immature.
Do not ignore the cuts that are created for too long. It’s important to suture these as soon as possible to prevent vital loss.
Tool Switching
Conviniently, the four main tools you use in this operation are on cardinal directions of the nunchuck: Gel, Sutures, Laser, and Scalpel. The only tools that are diagonal are the Ultrasound and Drain, and Forceps, the latter two of which are only used right at the start of treatment.
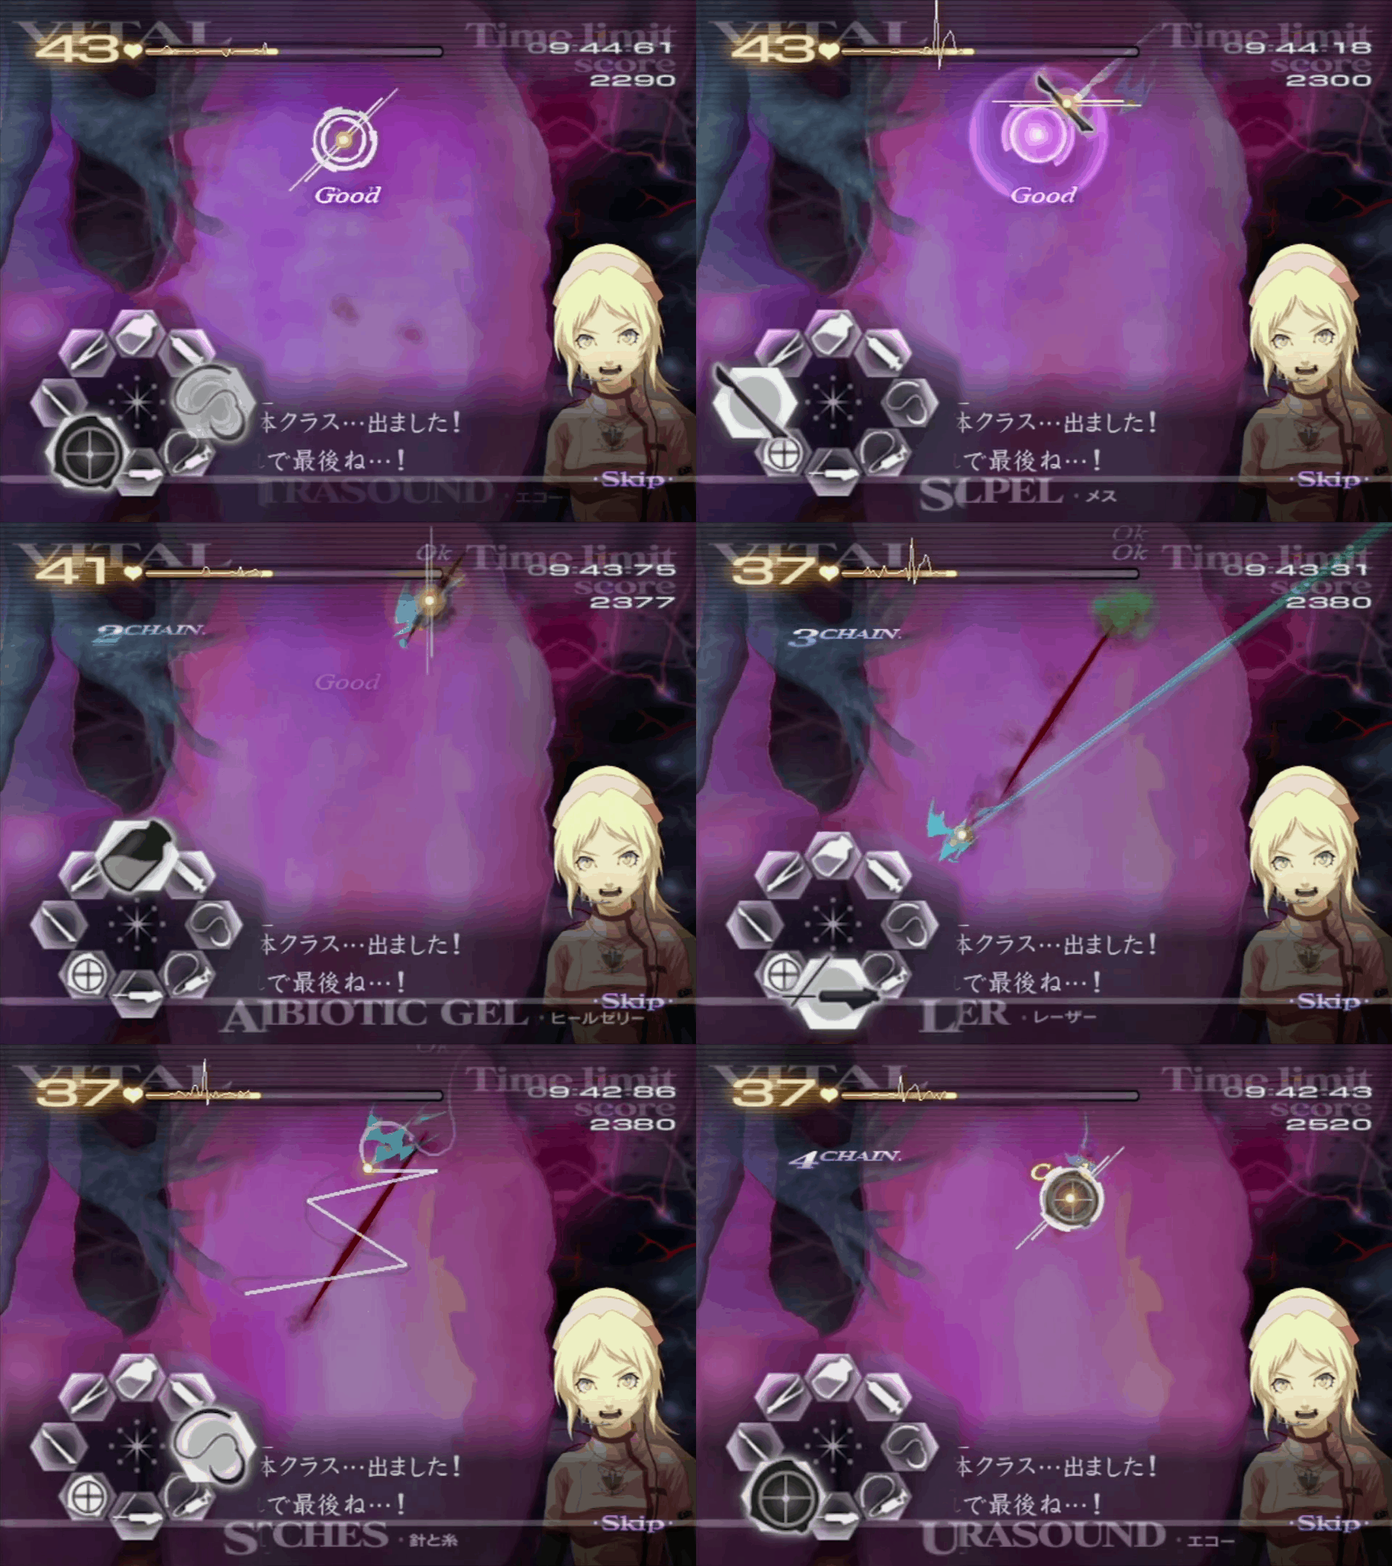
Ensuring your tool switching is consistent and effective will greatly improve your chances with dealing with Kyriaki is a quick manner. Tool ordering will look something like:
Suture, Ultrasound, Scalpel, Gel, Laser, Suture.

If you can’t get this down at first, don’t worry - it will come with time. Focus on getting this order down to ensure it’s ingrained for when you do start to pick up the pace.
Waves
Kyriaki is based in waves, meaning that in all operations (except for the operations in Chapter 6), you can hold off on starting the next wave and giving yourself time to boost the vitals before you begin.
As a general rule of thumb, the next wave of Kyriaki will not start until all the cuts are deal with.
A wave will always start with the cuts being made. How many cuts determines how many Kyriaki you have to deal with. The exception to this is in the final wave that forms an asterisk. This indicates you are on the final wave and the mature (and any accompanying immatures) have spawned.
At the start of every wave, ensure you suture the cuts before you begin to hunt the Kyriaki down.
Ultrasound
Given we need to ultrasound Kyriaki to be able to excise it even if we know exactly where it is. Casually you might spam the ultrasound, however this works against trying to find and excise Kyriaki as soon as possible. This is because if you ultrasound Kyriaki once, and it gets revealed, and then you ultrasound again, it can result in Kyriaki disappearing again in a shorter period of time than if you weren’t to ultrasound for the second time.
The solution to this is to ultrasound far less frequently, once a second is enough generally to find it. The exception to this is if you ultrasound and don’t find it at all, or only get it briefly. Then ultrasounding again either at next searching spot or where you know Kyriaki now is to get a confirmed reveal is much better.
It’s best to ultrasound towards the centre of the organ to reveal Kyriaki, especially in the lungs given the smaller space they can be in. Even if you don’t get a confirmed ultrasound, waiting half a second to a second will be enough time for Kyriaki to move closer to the centre.
Difficulty
The further you progress into the game, the trickier Kyriaki will get. From Z-5 onwards each immature will take an extra hit requiring 3 hits total with the laser, and the Mature will dive an additional time, resulting in a greater vital drop.
To go along side this, you will notice that for Paitent 3 onwards in 5-2, there is an accompanying immature to go with the Mature in the final wave. If the immature is left alone, it will cause more cuts and reduce vitals, so it’s best to kill it off as soon as possible.
Pathing
Kyriaki is limited to the shape of the organ, meaning you will never find it in the outer area of the operation field. This means that whenever it reaches the edge of the organ, it will bounce back inwards.
When a cut is made either at the start of a wave, or when the mature is dives, Kyriaki will continue the direction it was facing of the cut. This applies to the mature as well, where it can be found at the top of the organ, given the final cut ends there.
Additionally, the cut will never go beyond the bounds of the organ (and if it does, it’ll still be within the boundaries set by the game). When Kyriaki makes a cut, it randomly picks a direction, and if it can fit within the organ space, it makes the cut. This means if you expose Kyriaki near the edge of the organ, it will cut away from the edge, often inwards towards the centre.
| Main Page | Deftera → |